Monday, January 20, 2014

Just a Lovely Day

Hey friends,  
I've lost access to the posts on this blog (long story short!) and have decided to move.  
I've also wanted to broaden my blog scope to include my love for photography as well.  

My new blog is Just a Lovely Day.  
Please bear with me as I repost content that you've already seen.  
I do planning on adding new content as well.  
Hope to see you there! 

Saturday, December 7, 2013

Upcycled Newborn Christmas Hat

I found this lovely Christmas Red Sweater the other day at the thrift store.  It's hand knitted with a lovely mohair type fiber.  I also found the rabbit trim around the neck of a sweater and purchased it as well.  As soon as everything came home I threw it all in the washer.    
I turned the sweater inside out and cut off one of the arms at the proper length for a hat.  I sewed the top and then zigzagged on top and turned it inside out.  I sewed some of the rabbit trim into a circle and sewed it on the folded up rim of the hat.  Isn't it adorable?   
I've also done it with a few other sweaters hat and it is so much fun!  

Monday, November 18, 2013

Homemade Whipped Cream


I have sweet memorites of my Mom making up a batch of homeade Whipped Cream for the tops of pies and desserts during Thanksgiving and Christmas.  Oh how good that stuff was and I was quickly able to discern the difference between the 'real' stuff and the stuff that comes frozen in a tub.  The real stuff is AMAZING and it's so easy to make!
Whipped Cream,  Whipped Cream
I never measure but here I've used the entire half pint and about 1/8 cup of sugar or more depending on your taste and if you like it sweet or not. 
My Ruby Red Kitchen Aid waiting to be used~!
Add the cream and sugar to your bowl and whip up until it thickens. 
Don't overmix or it will seperate....
...and mix until peaks form.
The Whipped Cream should stand up on a sp
Whipped Cream, Whipping Cream
On to the best part... enjoy! 
Whipped Cream, Whipping Cream
Nothing, and I mean nothing, beats a dollop of Fresh Whipped Cream on the top dessert.  Or to just eat from a spoon!  

Tuesday, November 12, 2013

My new Cricut!

I've always wanted a Cricut Paper Die Cutter and finally found a used one for an awesome price!  I wanted to have it before the winter set in so I'd be able to do some crafting in the colder months.  
There is a definitely learning curve as I'm trying how to learn how to use this contraption!  
Above is my first card and below is my first envelope.  
With all of  the leftover pieces of paper I've been using them to make some odds and ends for tags and layering.  
I hope to post more projects as I learn! 

Tuesday, October 29, 2013

Mom's Teriyaki Chicken

From since I can remember My Mom has always made the most awesome Teriyaki Chicken.  So much better than buying the sauce in the grocery stores and it only takes a few minutes to whip up a batch with ingredients you probably already have in your cabinet.  

Ingredients 

1 bag of Chicken Thighs (I prefer with bones)  
1/2 cup soy sauce 
1/2 cup sugar~  brown or white 
spoonfull of minced garlic (fresh is best) 
One 'thumb knuckle' of ginger, grated 
(If I don't have it I don't use it but it's so much better with it and gives a great tang!)

After living in Korea for over 11 years I'm partial to Korean soy sauce but you can use Kikkoman or any brand.
Combine sugar and soy sauce in a small saucepan.  
Add the garlic and minced ginger if you have it.  Let it cool a bit.   
Prepare your chicken and lay skin side down in pan.  Pour sauce over top and cover.   Let marinate overnight or for 6 plus hours.  Midway through the marinating process turn over if possible to let the juices soak in to all areas of the chicken.   
I start with my chicken in the oven with skin sides down and turn it over mid way so the skin side is up and it looks all golden and brown when done. 

Bake 350 degrees for about 60-90 minutes, till chicken is cooked through and tender.  
I'd love to hear if you try my Mom's recipe and how you like it!  

Thursday, October 17, 2013

Homemade Hummus

We've had a hot summer and it left me not wanting to do much of anything.  Cooking was minimal due to the heat and even home things went undone.  With cooler weather I'm quite happy on becoming more domesticated again and back on track!  Yayyy!!!!  

Oh how I love Homemade Hummus!  I can eat it for any meal and it's truly one of my favorite things to snack on!  It's good with sliced up veggies such as carrotts,  green, red or yellow peppers, pita bread and whole grain crackers or chips.  

You can buy it at the grocery store (usually in the deli section) but it is so much more cost efficient and tasty to make it yourself at home.  

If you can't find tahini at an ordinary grocery store try a health food store.  

Without furthur ado, here's my go to recipe.  You don't have to follow it to a T and it's a general guideline.  

1 can of garbanzo beans (also called chickpeas)  
1 lemon cut in half and juice set aside
1/4 cup tahini, or more or less to your taste
1 Tbsp minced garlic (I use the minced garlic in a jar)  
1 tsp of salt (add more if desired) 
Olive oil 
Paprika

Drain chickpeas of juice and set aside.  Put lemon juice,  tahini,  minced garlic, salt and chickpeas in food processor (you can also use a blender)  and give it a whir.  Add some olive oil and water and keep adding until you are able to blend hummus into a smooth paste.  Some like it very smooth and some like it more grainy.  Add more oil and salt until desired taste and consistency.  


Before serving, drizzle the top with olive oil and some paprika. 


Friday, August 30, 2013

Happy Labor Day~My cute little Strawberry Dish

Summer is definitely here!  
I've been enjoying time outside and not cooking and baking like I would normally do in the cooler weather.  As a result my blog has been languishing a bit.  
I never thought I'd say it.... but I really am looking forward to more tolerable weather.  

I recently picked up this cute little dish for my Sweetheart Kitchen and love it so!  
Best of all it was only 50 cents!  How could I ever resist such cuteness?  

We're been invited to a labor day Barbecue and I'm wondering what to bring for the potluck.
I really want to try something that I haven't made in the past year so will have to go through my recipe archives and see what strikes my fance. 
I'd love some suggestions if you have them!  

Have a wonderful Holiday Weekend! 


Sunday, August 25, 2013

A New Home for Rednesday!


Please head on over to Melody's blogs~  Her adorable blog can be found here.  Please stop by her blog and shower her with much love and comments!   

Tuesday, August 6, 2013

Rednesday~

Have you ever bit of more than you can chew? 
I have and it's finally nice to be able to play catch up and get back to normal.  

 I've always wanted to host a linky party/blog hop so when Rednesday became available it seemed perfect for me.  I jumped at the opportunity to host it.  

But along the way, I've seemed to lose something...  

The requirement to host and blog has become difficult for me to maintain.  It takes me nearly an hour to put the weekly Rednesday blog post together.   I was frantic over featuring everyone, not wanting to leave anyone out,  and there was a lack in my blogging and commenting with other bloggers.  

I wasn't CONNECTING to other like minded bloggers out of friendship but out of obligation.  
Motive is important to me.  
It was becoming something I had to do instead of wanted to do.  
I'd like to simplify and go back to the reason I started blogging.  
To make friends and connect.  

So, with all that being said,  I'm relinquishing Rednesday.  
I still love blog hops but I don't think I'm the type of person to host.  Participating is more my game.  
  
If you'd like to take over please leave a comment on this blog post and I'll make an announcement directing folks over to your blog.    

Thank you so much for visiting, for linking up, and for sharing a part of your life with me!   
Most of all, thank you for understanding! 

Banana Crumb Muffins

These are good.  Really good.  What I really love about them is that they don't take forever to cook (like traditional Banana Bread does) and they don't get too dark where the muffin and pan meet.  Win/win in my book.    
I hope you enjoy these as much as my hubby and I are!

Mix together Streusel/Crumb Topping Ingredients.
1/4 cup butter or shortening (your preference) 
1/2 cup sugar 
1/3 cup flour 
Add more flour and sugar if neccesary so topping is crumbly and not too greasy.   Set aside.

In bowl, mix together following dry ingredients:
1 1/2 cups flour 
3/4 cup sugar 
1/3 cup oil 
1/2 tsp salt 
2 tsp baking powder

In seperate bowl mix together following wet ingredients 
1 egg
1/3 cup milk 
3 medium bananas (mashed with a fork)

It's best to mix these by hand since using a stand or hand mixer usually causes them to be overmixed.  Add wet ingredients to dry ingredients using a wire whisk or spatula just until moistened and flour clumps are mixed in.  Do not overmix or the consistency won't be right.  

Scoop into greased muffin tins and top liberally with streusel/crumb topping.  

Bake at 350 for 15-18 minutes until knife inserted comes out clean and top of muffins springs back when touched.  Add an additional 3 minutes of baking if needed.  


Saturday, August 3, 2013

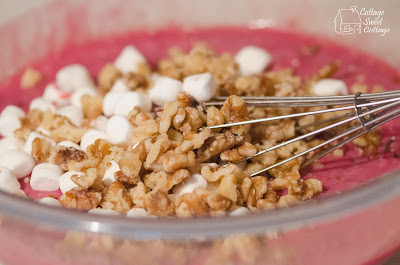
Cherry Fluff

This is so yummy on a hot summer day, for a picnic or a potluck or any time you fancy something chilled and sweet.  It's so easy to throw together and I like to make it the day before so it has time to chill and firm up.  
I hit Aldi's today and found everything that I needed in generic form~ and it didn't effect the taste in any way.  

One can cherry pie filling 
(I've always wanted to use another type of filling but have never taken the plunge yet!) 
One can sweetened condensed milk 
16 ounces Cool Whip 
16 ounces crushed pineapple~  do not drain
1 cup chopped nuts (optional) 
1 cup mini marshmellows
In a very large bowl combine pie filling, crushed pineapple and sweetened condensed milk.  
Toss in mini marshmellows and nuts.
Whip all together until incorporated.
Fold in Cool Whip.  
Chill overnight or for a few hours before serving.

Tuesday, July 9, 2013

Jalapeno Poppers

I had these for the first time about 2 weeks ago at a graduation and they are absolutely stupendous!  Even the hubs was asking when we'd have them again.  It's something about the spiciness of the jalapenos and the texture and coolness of the cream cheese.  Add bacon to the mix and it's a wonderful combination~  oh yeah!  
1 pound of bacon
8 jalapeno peppers, firm and smooth
1 block of cream cheese
Cut jalapenos in half and remove seeds, membranes and stem. 
Spread some cream cheese in each one and place on greased cookie sheet.  I wish I had a baking rack to lift them off the pan but I don't.  
Cut your entire package of bacon in half and wrap a slice of bacon around each popper.  I didn't secure mine with a toothpick but will do that next time since they unwound themself during baking.
Bake at 350 for 20 to 25 minutes
I'm feeling the need to mention that neither my hubby and I like extrememly spicy food.  We do love foods with a little kick but nothing that will set your mouth on fire.  The jalapeno peppers really do get mild when baked in the oven and are not overpowering.   
Spicy, creamy and bacony.  Just delicious!